Get started with Amazon S3
Step-by-step instructions to ingest Parquet files in S3 to Propel.
Architecture
Amazon S3 Data Pools connect to a specified Amazon S3 bucket and automatically synchronize Parquet files from the bucket into your Data Pool.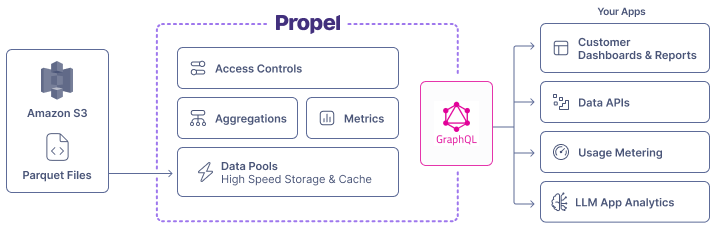
Features
Amazon S3 Parquet Data Pools support the following features:| Feature name | Supported | Notes |
|---|---|---|
| Syncs new records | ✅ | |
| Configurable sync interval | ✅ | See the How Propel syncs section below. It can be configured to occur at intervals ranging from every minute to every 24 hours. |
| Sync Pausing / Resuming | ✅ | |
| Real-time updates | ✅ | See the Real-time updates section. |
| Real-time deletes | ❌ | See the Real-time deletes section. |
| Batch Delete API | ✅ | See Batch Delete API. |
| Batch Update API | ✅ | See Batch Update API. |
| API configurable | ✅ | See API docs. |
| Terraform configurable | ✅ | See Terraform docs. |
How Propel syncs Parquet files in Amazon S3
The Amazon S3-based Data Pool syncs Parquet files from your S3 bucket. You specify:- Bucket name
- File path
- The schema of the data
- Sync interval (1 minute to 24 hours)
-
To sync all Parquet files, use the following path:
-
To sync files in a specific directory (e.g., “sales”):
Use the
*.parquet pattern to sync only Parquet files, excluding other file types.New records and updates
How records are ingested depends on the table engine you select when you create your Data Pool.- MergeTree Data Pools (append-only data): Syncs inserts and ignores updates.
- ReplacingMergeTree Data Pools (mutable records): Syncs inserts and updates records with the same sorting key.
Schema changes
Propel enables the addition of new columns to Amazon S3 Data Pools through theAddColumnToDataPool job.
For breaking changes like column deletions or type modifications, recreate the Data Pool.
See our Changing Schemas section for more details.
Data Types
The table below shows default Parquet to Propel data type mappings. When creating an Amazon S3 Parquet Data Pool, you can customize these mappings.| Parquet Type | Propel Type | Notes |
|---|---|---|
BOOLEAN | BOOLEAN | |
INT8 | INT8 | |
UINT8 | INT16 | |
INT16 | INT16 | |
UINT16 | INT32 | |
INT32 | INT32 | |
UINT32 | INT64 | |
INT64 | INT64 | |
UINT64 | INT64 | |
FLOAT | FLOAT | |
DOUBLE | DOUBLE | |
DECIMAL(p ≤ 9, s=0) | INT32 | |
DECIMAL(p ≤ 9, s>0) | FLOAT | |
DECIMAL(p ≤ 18, s=0) | INT64 | |
DECIMAL(p ≤ 18, s>0) | DOUBLE | |
DECIMAL(p ≤ 76, s) | DOUBLE | |
DATE | DATE | |
TIME (ms) | INT32 | |
TIME (µs, ns) | INT64 | |
TIMESTAMP | TIMESTAMP | |
INT96 | TIMESTAMP | |
BINARY | STRING | |
STRING | STRING | |
ENUM | STRING | |
FIXED_LENGTH_BYTE_ARRAY | STRING | |
MAP | JSON | |
LIST | JSON |