Get started with Snowflake
Step-by-step instructions to connect your Snowflake data warehouse to Propel.
Architecture
Snowflake Data Pools connect to your Snowflake instance to sync data from a specified table, view, or Dynamic Table into Propel. Syncs can be configured to occur at intervals ranging from 1 minute to 24 hours.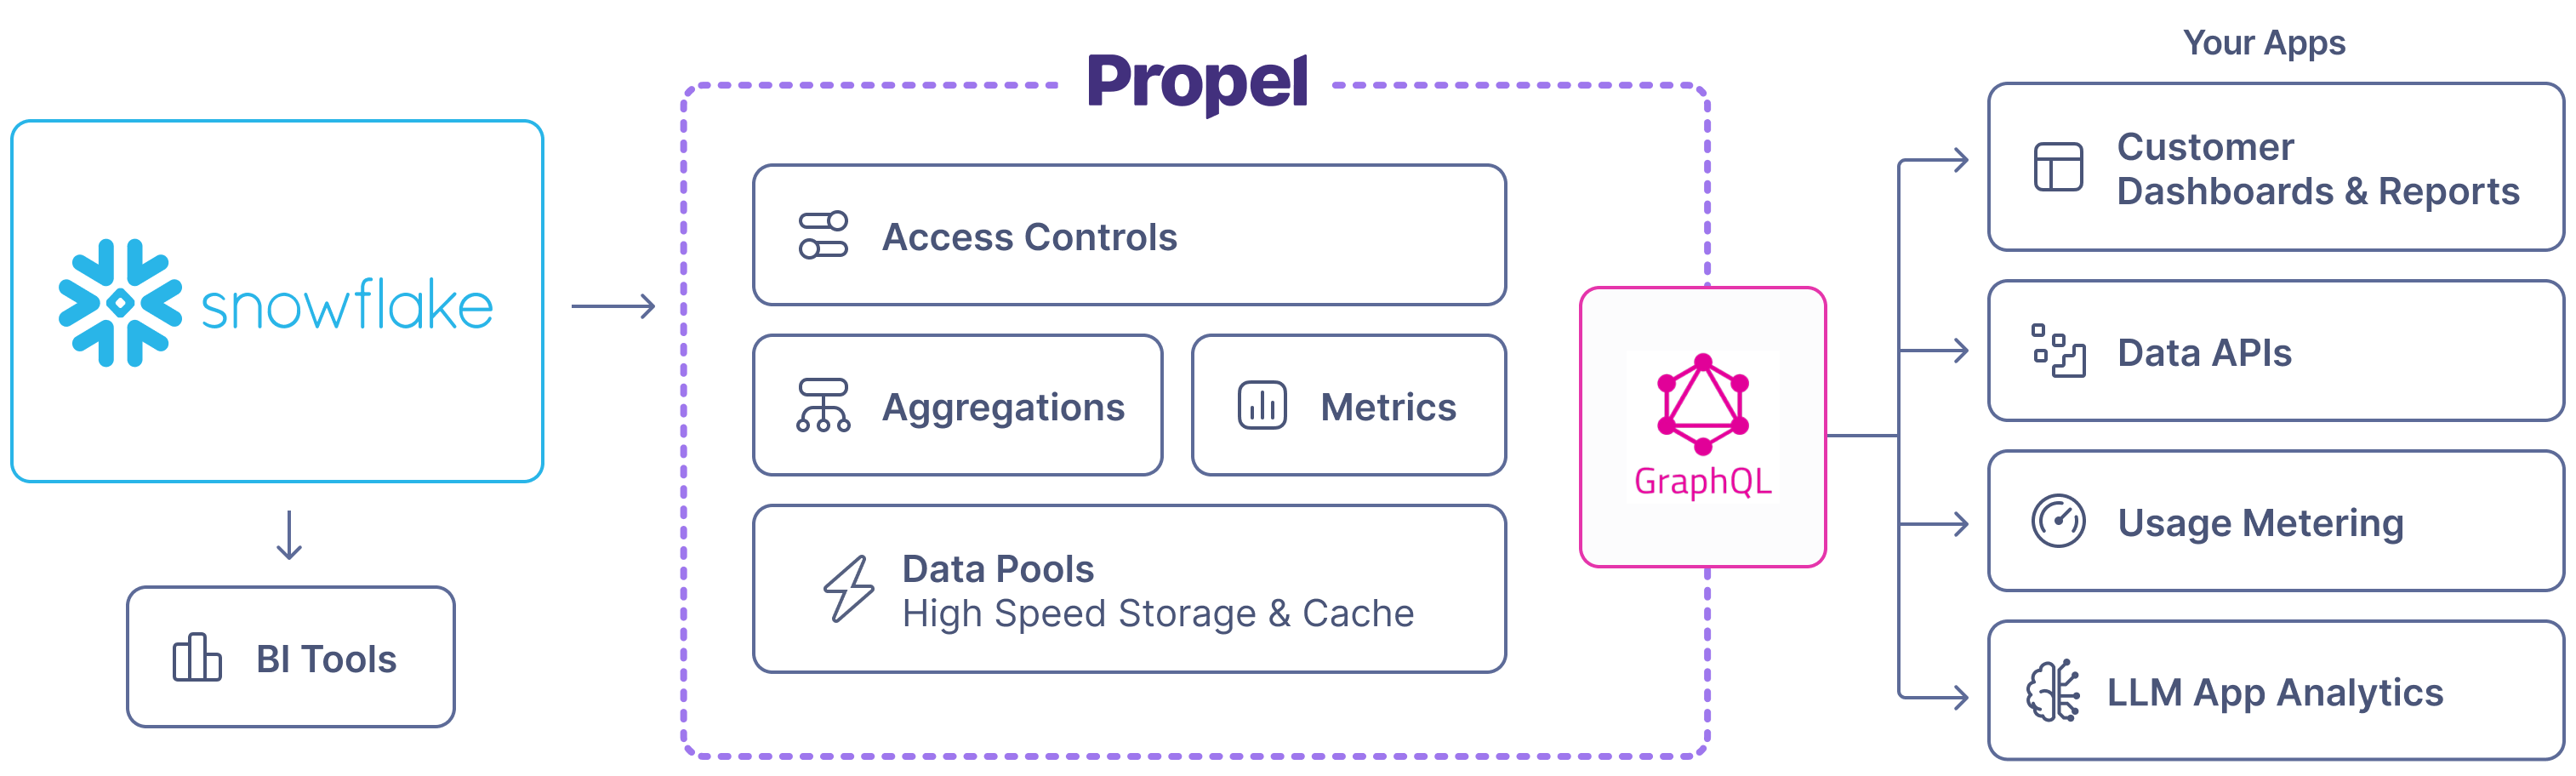
Features
| Feature name | Supported | Notes |
|---|---|---|
| Syncs inserts, updates, and deletes. | ✅ | See How Propel syncs inserts, updates, and deletes. |
| Re-sync | ✅ | See Re-sync section. |
| Configurable sync interval | ✅ | See How Propel syncs section. It can be configured to occur at intervals ranging from every minute to every 24 hours. |
| Sync Pausing / Resuming | ✅ | |
| Real-time updates | ✅ | See the Real-time updates section. |
| Real-time deletes | ✅ | See the Real-time deletes section. |
| Batch Delete API | ✅ | See Batch Delete API. |
| Batch Update API | ✅ | See Batch Update API. |
| API configurable | ✅ | See API docs. |
| Terraform configurable | ✅ | See Terraform docs. |
How Propel syncs inserts, updates, and deletes
Propel uses Snowflake streams for change data capture to sync records. The sync behavior depends on your chosen table engine:- MergeTree (append-only): Syncs inserts only.
- ReplacingMergeTree (mutable): Syncs inserts, updates, and deletes based on sorting key.
Snowflake warehouse activates on each sync. Consider costs when setting intervals. We recommend a 60-second minimum auto-suspend period.
Supported data structures
Propel can sync these Snowflake data structures:| Structure | Requirement |
|---|---|
| Table | Change tracking enabled |
| View | Change tracking enabled on underlying tables |
| Dynamic Tables | No additional setup (change tracking always enabled) |
Schema changes
Propel enables the addition of new columns to Snowflake Data Pools through theAddColumnToDataPool job.
For breaking changes like column deletions or type modifications, recreate the Data Pool.
See our Changing Schemas section for more details.
Re-syncing data
Snowflake Data Pools with ReplacingMergeTree engine support safe re-syncing of all data. This operation:- Continues serving data to your application
- Avoids creating duplicates
- Doesn’t persist deleted Snowflake data
- Snowflake stream is deleted, failed, or stale
- Table is re-created
- Stream is manually deleted
dbt full-refreshoperation re-creates the table
reSyncSnowflakeDataPool mutation for API-based re-syncing.
Data Types
The table below shows default Snowflake to Propel data type mappings. When creating a Snowflake Data Pool, you can customize these mappings.| Snowflake Type | Propel Type | Notes |
|---|---|---|
DATETIME, TIMESTAMP_NTZ, TIMESTAMP_LTZ, TIMESTAMP_TZ, TIMESTAMP(p) | TIMESTAMP | Timestamps without a timezone will be synced as UTC. |
DATE | DATE | |
BOOLEAN | BOOLEAN | |
NUMBER(p≤9, s=0) | INT32 | |
NUMBER(p≤18, s=0) | INT64 | |
NUMBER(p≤9, s>0) | FLOAT | |
NUMBER(p≤18, s>0), NUMBER(p>18, s) | DOUBLE | |
NUMBER(p, s), DECIMAL(p, s), NUMERIC(p, s) | Depends on precision and scale | |
NUMBER(38, s>0), INT, INTEGER, BIGINT, SMALLINT, TINYINT, BYTEINT | DOUBLE | Snowflake maps INT types to NUMBER(38, 0), which Propel represents as a DOUBLE as it can have numbers larger than INT64. See Snowflake numeric types. |
FLOAT, FLOAT4, FLOAT8, DOUBLE, DOUBLE PRECISION, REAL | DOUBLE | |
VARCHAR, CHAR, CHARACTER, STRING, TEXT, BINARY, VARBINARY | STRING | |
TIME | STRING | |
VARIANT, OBJECT, ARRAY | JSON | |
GEOGRAPHY, GEOMETRY | Not supported |
Frequently Asked Questions
How long does the data take to sync from Snowflake to Propel?
How long does the data take to sync from Snowflake to Propel?
Data is synchronized based on your configured sync interval. You can sync as often as every minute or up to 24 hours. Once a sync is initiated, the data will be available in Propel and served via the API in 1-3 minutes.
Does Propel read through to Snowflake on every query?
Does Propel read through to Snowflake on every query?
No. Propel only queries Snowflake to sync newly inserted, updated, or deleted records.
Can you sync only certain columns from Snowflake into a Data Pool?
Can you sync only certain columns from Snowflake into a Data Pool?
Yes. When you create the Data Pool, you can select which columns from the underlying table you want to sync. This is useful if there is PII or any other data that you don’t need in Propel.
What happens if Snowflake is down?
What happens if Snowflake is down?
When does the Data Pool syncing interval start?
When does the Data Pool syncing interval start?
The syncing interval starts when your Data Pool goes
LIVE or when syncing is resumed.