Customer-facing analytics has emerged as a key feature for SaaS products to offer their customers. It involves surfacing insights to end customers as part of the product experience. When you log in to Stripe, Shopify, or Google Adwords, they show you all the relevant analytics you need to know to use their product effectively. To effectively analyze data, you may need to move data from operational databases, such as MongoDB, to a scalable and cost-effective data storage service like Amazon S3. This transfer is often necessary to perform large-scale data processing and analytics tasks that are not feasible within the operational database due to resource constraints.
Parquet, a columnar storage file format, is particularly suitable for this data transfer pipeline. It offers efficient data compression and encoding schemes that result in reduced storage space and improved query performance. Parquet is also optimized for use with big data processing frameworks like Apache Spark, Flink, Hadoop, DucksDB, and so on. Moreover, it supports complex nested data structures that are common in document-oriented databases like MongoDB, making it an excellent choice for storing MongoDB data.
In this tutorial, you'll learn how to set up a data pipeline to move data from MongoDB to Amazon S3 in Parquet format using MongoDB Atlas's Data Federation feature. Opting for MongoDB Atlas's Data Federation leverages MongoDB's existing Atlas infrastructure, so you don’t need any external data pipelines. Using this method, you can query and transform data before exporting to S3 and automate data movement based on event triggers. Beyond this method, if you wanted better flexibility, you could write custom scripts in Python or other languages to move data from MongoDB to Amazon S3 in Parquet format. However, this would require significant development effort.
Prerequisites
You'll need the following to complete this tutorial:
- A MongoDB Atlas account
- A MongoDB cluster, as well as a remote MongoDB instance, is managed in the Atlas interface and loaded with sample data sets provided by MongoDB Atlas. You'll be using the <span class="code-exp">
sales</span>collection in the[<span class="code-exp">sample_supplies</span>database](https://www.mongodb.com/docs/atlas/sample-data/sample-supplies/#std-label-sample-supplies). - The AWS CLI is installed and configured to use with your AWS account. Your AWS account also needs permission to manage IAM roles and S3 buckets.
- Two new Amazon S3 buckets. You'll be using one of the S3 buckets (named something like
<span class="code-exp">demo-initial-load-data-from-mongodb-to-s3</span>) for moving the existing data once and another (named something like <span class="code-exp">demo-data-from-mongodb-to-s3</span>) for moving the incremental data as part of a continuous data pipeline. - The MongoDB Shell is installed to interact with MongoDB and perform an initial load of data from the sample database to S3.
Moving Data from MongoDB to Amazon S3 in Parquet
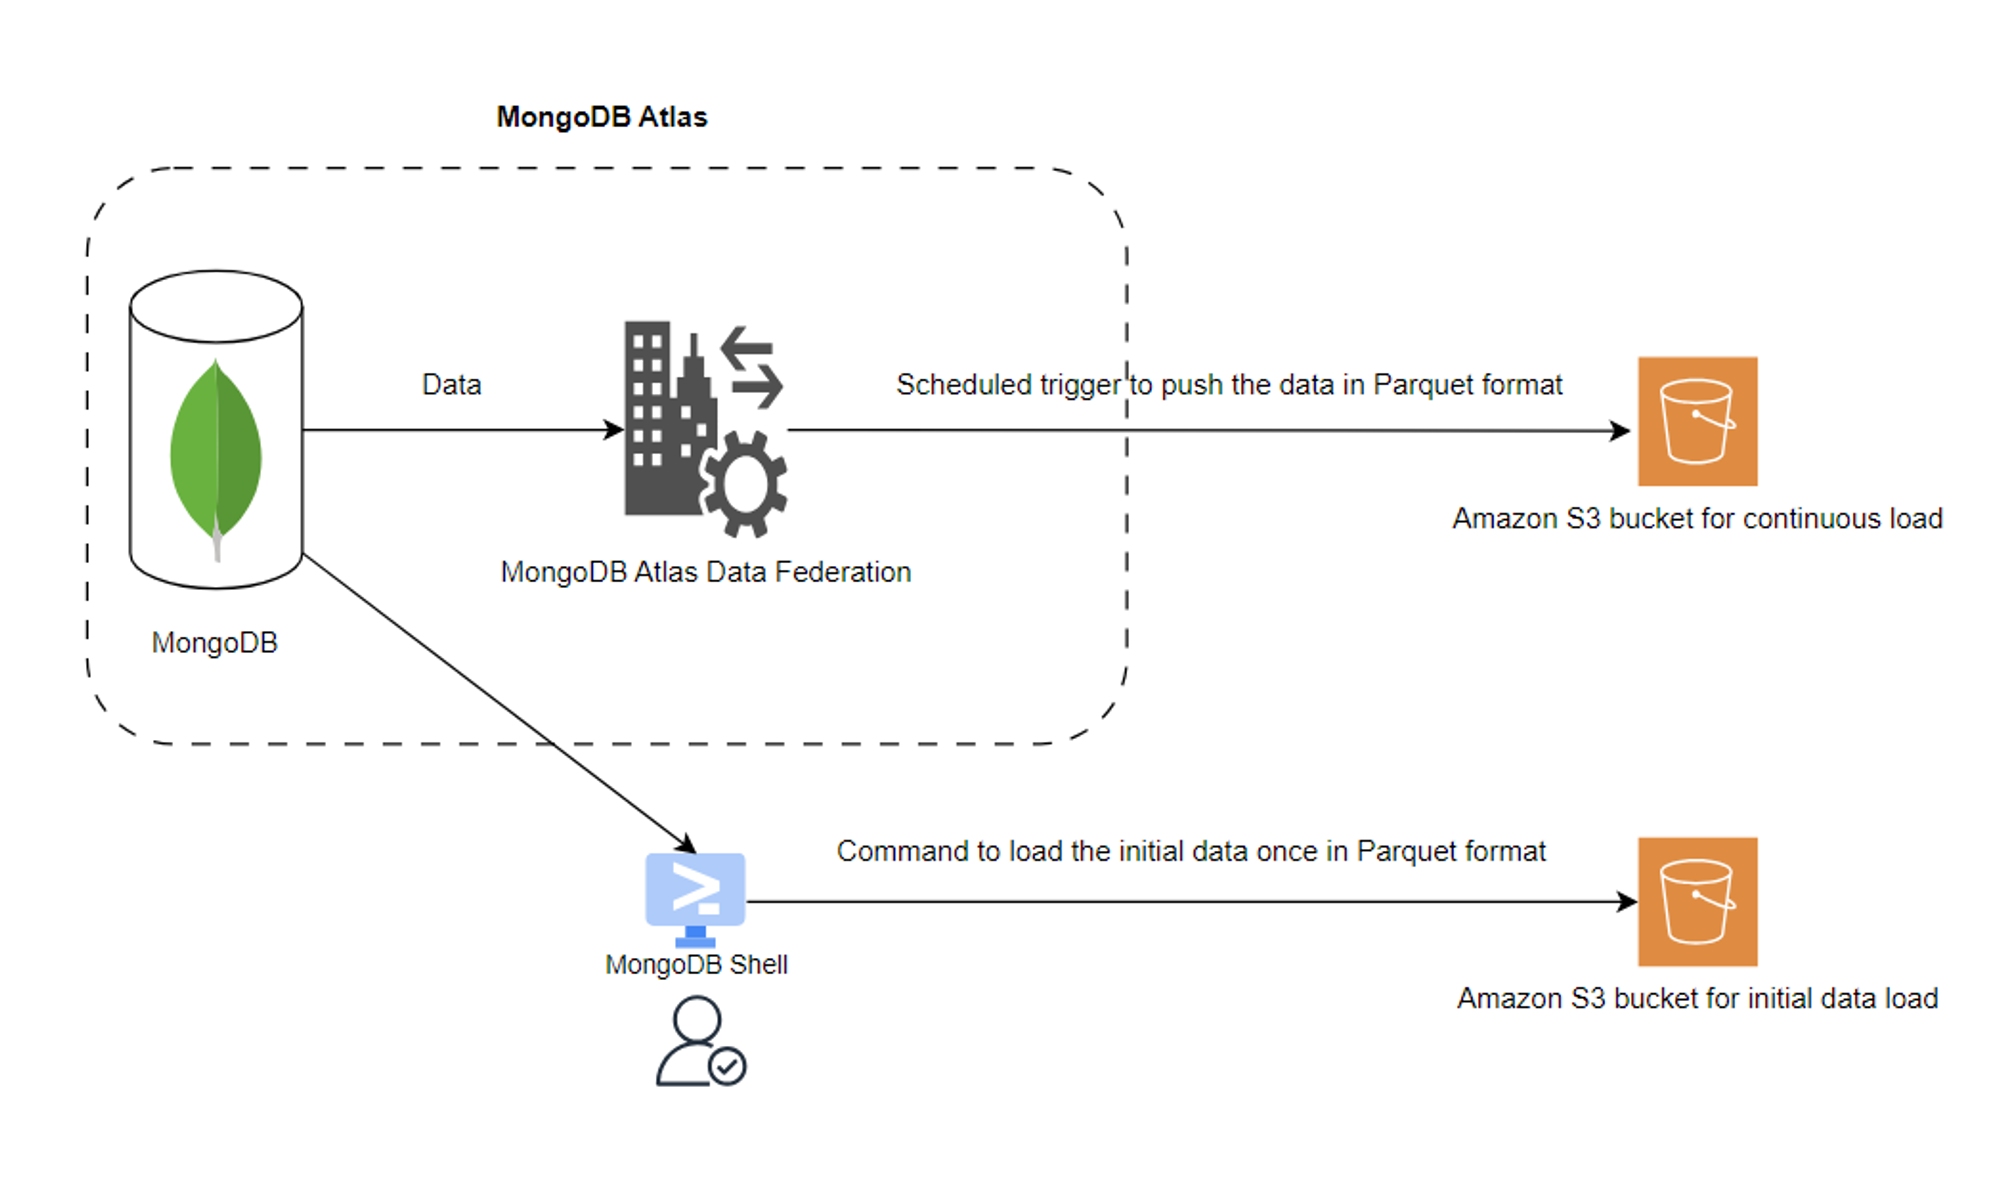
Once you have all the required software, tools, and accounts in place, you can review the diagram below to help you understand the solution that you'll be implementing in order to learn how to move data from MongoDB to Amazon S3 in Parquet:

This tutorial explores two different ways of moving data from MongoDB to Amazon S3: manual, one-time migrations and automated, continuous migrations.
Manual, one-time migrations are useful when you need to move a large amount of existing data from MongoDB to S3 simultaneously. For this, you'll use the <span class="code-exp">mongosh</span> tool to carry out the initial data load from a MongoDB collection to the S3 bucket <span class="code-exp">demo-initial-load-data-from-mongodb-to-s3</span>. This operation is performed manually and is typically done when setting up a new data pipeline or migrating data to a new storage system.
Automated, continuous migrations are useful when you need to continuously move new data from MongoDB to S3 as it comes in. For this, you'll use MongoDB Atlas's Data Federation service for incremental data load operations from the same MongoDB collection to another S3 bucket,<span class="code-exp">demo-data-from-mongodb-to-s3</span>. This operation is performed automatically and continuously, ensuring that your S3 bucket is always up to date with the latest data from MongoDB.
The Data Federation service acts as a bridging layer between the MongoDB collection and the S3 bucket. In both of the data load operations (initial and continuous), the final data will be converted into the Parquet file format. For a successful data load operation, you need to set up AWS IAM roles and policies so that the user account in Atlas has the required privilege. You'll see how to do this setup shortly.
Verifying the Initial State of the MongoDB Collection
Let's begin by verifying the MongoDB collection and S3 buckets before setup.
When you log in to your Atlas account, you should see a landing overview page:
.png)
This shows that you have a MongoDB cluster ready to connect. Clicking the CONNECT button will show you a screen with tools to connect to MongoDB:
.png)
Choosing the Shell tool from the listed options will display a screen with database connection information:
.png)
Copy the connection string information displayed on the screen to connect to the MongoDB database using the <span class="code-exp">mongosh</span> tool. You should see the connection string information in a format similar to the following:
Open a terminal and execute the connection string command. You'll be prompted for the password for your MongoDB database (which you set up earlier). Once authentication is successful, you should see the following output:
.png)
Execute the following commands in the <span class="code-exp">mongosh</span> terminal to switch to the <span class="code-exp">sample_supplies</span> database and count the documents in the <span class="code-exp">sales</span> collection:
If you have loaded the sample data set, the output <span class="code-exp">5000</span> should be displayed:
.png)
Execute the following command to select a document from the <span class="code-exp">sales</span> collection:
You should get this output:
You'll use the <span class="code-exp">_id</span> field during the federated database setup.
Keep the terminal with the <span class="code-exp">mongosh</span> session open, as you'll need this later.
Verifying the Initial State of the S3 Buckets
Open another terminal and execute the following commands:
After executing these commands, you should see an empty response for each command, indicating that both S3 buckets (<span class="code-exp">demo-initial-load-data-from-mongodb-to-s3</span>) currently have no content. If you don't encounter any errors during this process, it means that your AWS CLI setup is correct. The terminal screen should look like this:
.png)
Now that MongoDB and the S3 buckets are ready and verified in their initial state, let's move on to creating the federated database instance in the Atlas console.
Creating a Federated Database in Atlas
You'll be setting up your federated database instance to establish a connection between your MongoDB cluster and the Amazon S3 bucket and allow data movement between them.
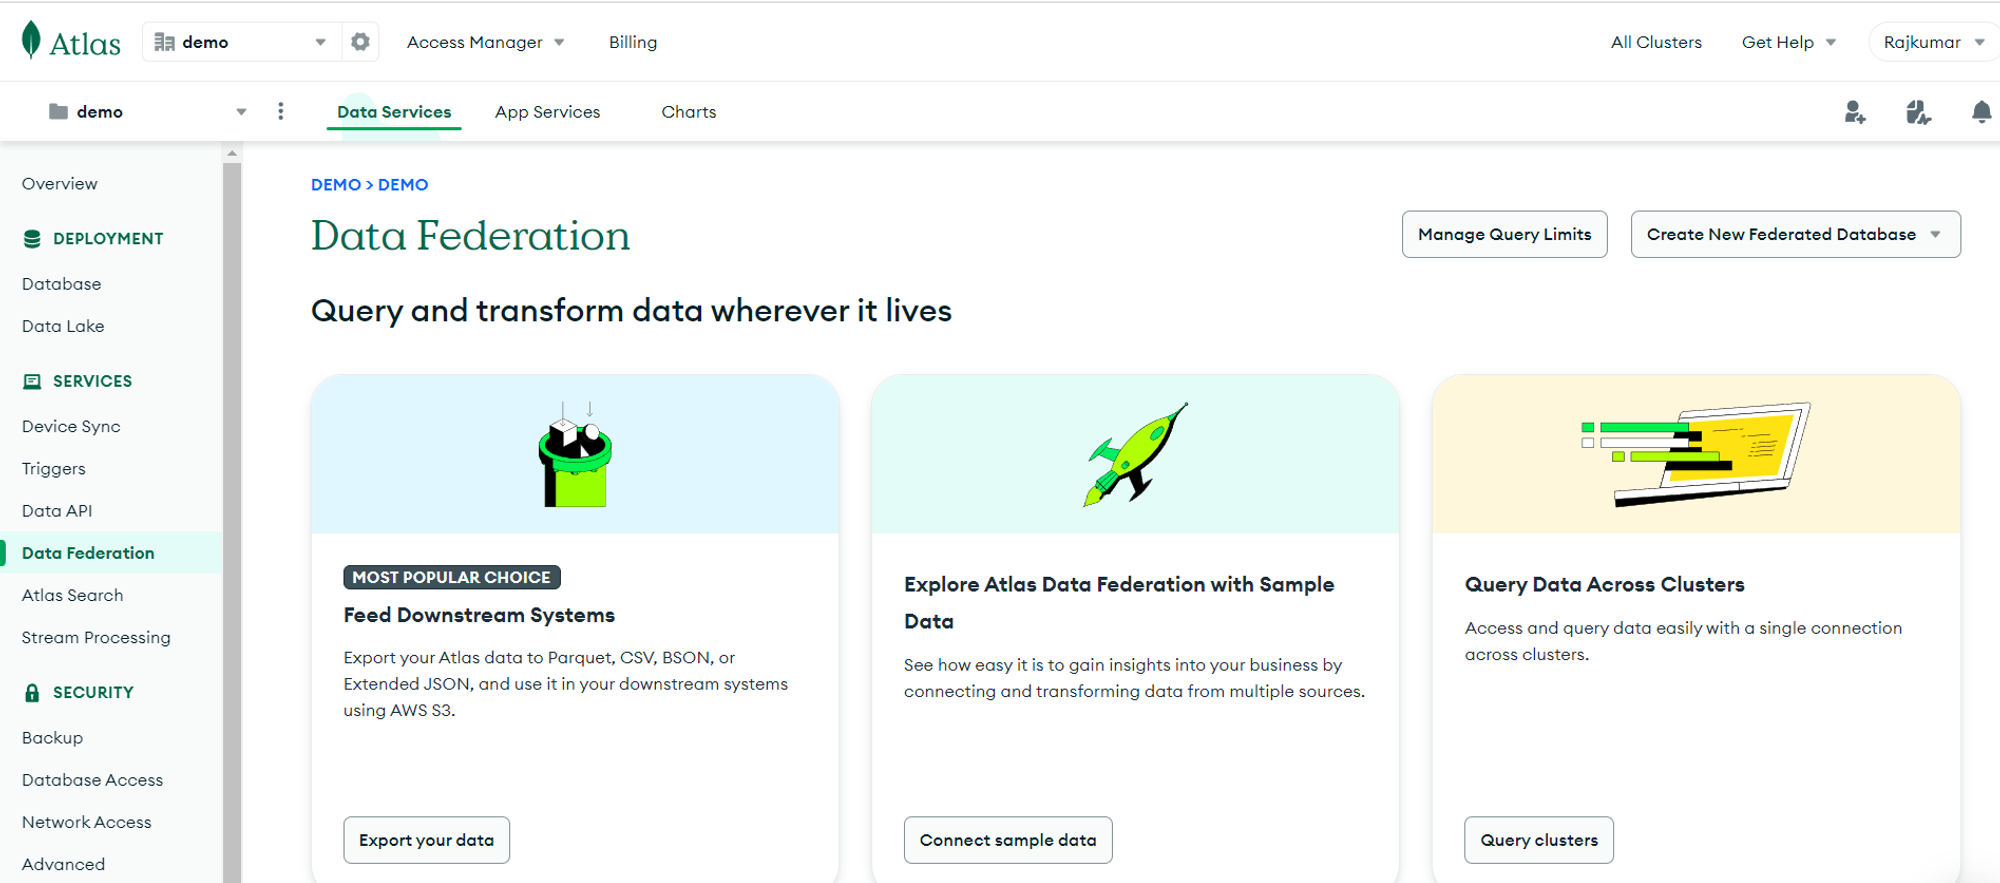
To start, click the Data Federation option from the side menu in the Atlas UI. You'll be presented with a screen that offers several options for querying and transforming your data:

Click the Create New Federated Database dropdown menu and select the Feed Downstream Systems option:
.png)
You can read the information displayed on the next screen and click Get Started:
.png)
Select the cloud provider and key in the federated database instance name. This example uses the default options, so you can click Continue:
.png)
Next, you have to choose the source (MongoDB cluster) to set up the federated database instance connection with the database. Choose Cluster0 from the dropdown menu, then select Specific Collections. Make sure that <span class="code-exp">sample_supplies</span> and <span class="code-exp">sales</span> are checked.
.png)
You then have to set up an AWS role in your AWS account to perform the data load operation from MongoDB to the Amazon S3 buckets. In the Role ARN dropdown menu, select Authorize an AWS IAM Role to create a new AWS IAM role:
.png)
Copy the Atlas AWS account ARN and your unique external ID, and keep them somewhere safe. You'll need this information to add your Atlas account to the trust relationship of the AWS IAM role that you'll create shortly.
On the same screen (you might need to scroll down here), the UI will display some information that shows you how to create a new AWS IAM role in a step-by-step approach:
.png)
Follow the instructions as shown to save the <span class="code-exp">role-trust-policy.json</span> file, then open a terminal and switch to the directory where you stored the file. Execute the <span class="code-exp">create-role</span> AWS CLI command in the terminal:
You should see the following output:
Copy the AWS role ARN shown in your terminal, which is <span class="code-exp">arn:aws:iam: :12343412506:/role/atlas-data-lake-role</span> in the above example. Paste the copied ARN into the role ARN field and click Validate AWS IAM role to validate the completed setup:

Once validated, proceed with filling in the S3 bucket information:
.png)
Remember to fill in the incremental load S3 bucket name (<span class="code-exp">demo-data-from-mongodb-to-s3</span>). The schedule that you'll create as part of this federated database setup can only carry out scheduled jobs and not a one-time initial load process. Therefore, you'll need to do the initial loading of data to the S3 bucket later using a different approach.
Once you have filled in the S3 bucket name, the UI will display the contents of <span class="code-exp">adl-s3-policy.json</span>, which is a new file that you'll create next:
.png)
Create the <span class="code-exp">adl-s3-policy.json</span> file on your machine using the code on your screen. Next, open a terminal and switch to the directory where you stored this file, then execute the following command in the terminal:
This command will also be displayed on your UI screen. After executing the command, click Validate AWS S3 bucket access to validate the setup. On successful validation, click Continue.
You'll see a screen with options to schedule the data movement process. For the purposes of this tutorial, configure the values in the fields as shown below:
.png)
The above screenshot shows that you are scheduling the data movement process for every minute. Note that Parquet is selected as the data file format. You don't need to write any code to achieve this format conversion. Simply specify the values in the other fields as follows:
.png)
Entering a value in the File Destination Root Path field will generate a directory bearing that name within the S3 bucket. As mentioned, the <span class="code-exp">_id</span> field is specified in the date field and uses the format specified in the Date Field Format dropdown menu. MongoDB internally understands the value in this <span class="code-exp">_id</span> field as a valid date/timestamp format. This is helpful for incremental data load operations, as it allows you to fetch the data during a specified time interval. You don't need to worry about the internal implementation since all these aspects are handled automatically for you.
Click Continue to proceed to the final review and confirmation screen:
.png)
After reviewing your inputs, click Create to create the federated database instance. It might take a while for the Atlas UI screen to complete this operation.
You should be able to see a screen similar to the one below by clicking the Data Federation option in the side menu:
.png)
Click Connect, then choose Shell as the tool option on the next screen:
.png)
On the next screen, you'll see the connection string information:
.png)
Copy the connection string and keep it somewhere safe, as you'll need this information to perform the initial data load operation from MongoDB to an S3 bucket in the next step.
Setting Up the Initial Data Load from MongoDB to S3 in Parquet
First, you must ensure that the IAM role <span class="code-exp">atlas-data-lake-role</span> has the necessary permissions to access the S3 bucket <span class="code-exp">demo-initial-load-data-from-mongodb-to-s3</span>. This involves adding a policy to the IAM role. To do this, edit the <span class="code-exp">adl-s3-policy.json</span> file that you created earlier by replacing its existing contents with the following:
Save the file and execute the below command in a terminal from the directory where the file is saved:
Open a terminal and execute the federated database connection string command you copied earlier:
You'll be prompted for the password for your MongoDB database. Once authenticated, execute the following command in the<span class="code-exp">mongosh</span> terminal to perform the initial data load:
This command performs an operation that moves data from the <span class="code-exp">sales</span> collection in the <span class="code-exp">sample_supplies</span> database and writes the output to an S3 bucket (<span class="code-exp">demo-initial-load-data-from-mongodb-to-s3</span>) in Parquet format. The <span class="code-exp">$out</span> keyword holds the destination options. This whole operation runs in the background.
Once the initial data load is complete, open another terminal and execute the following AWS CLI command:
You should see the following output:
Download the Parquet file to your local machine's current directory by using the command below:
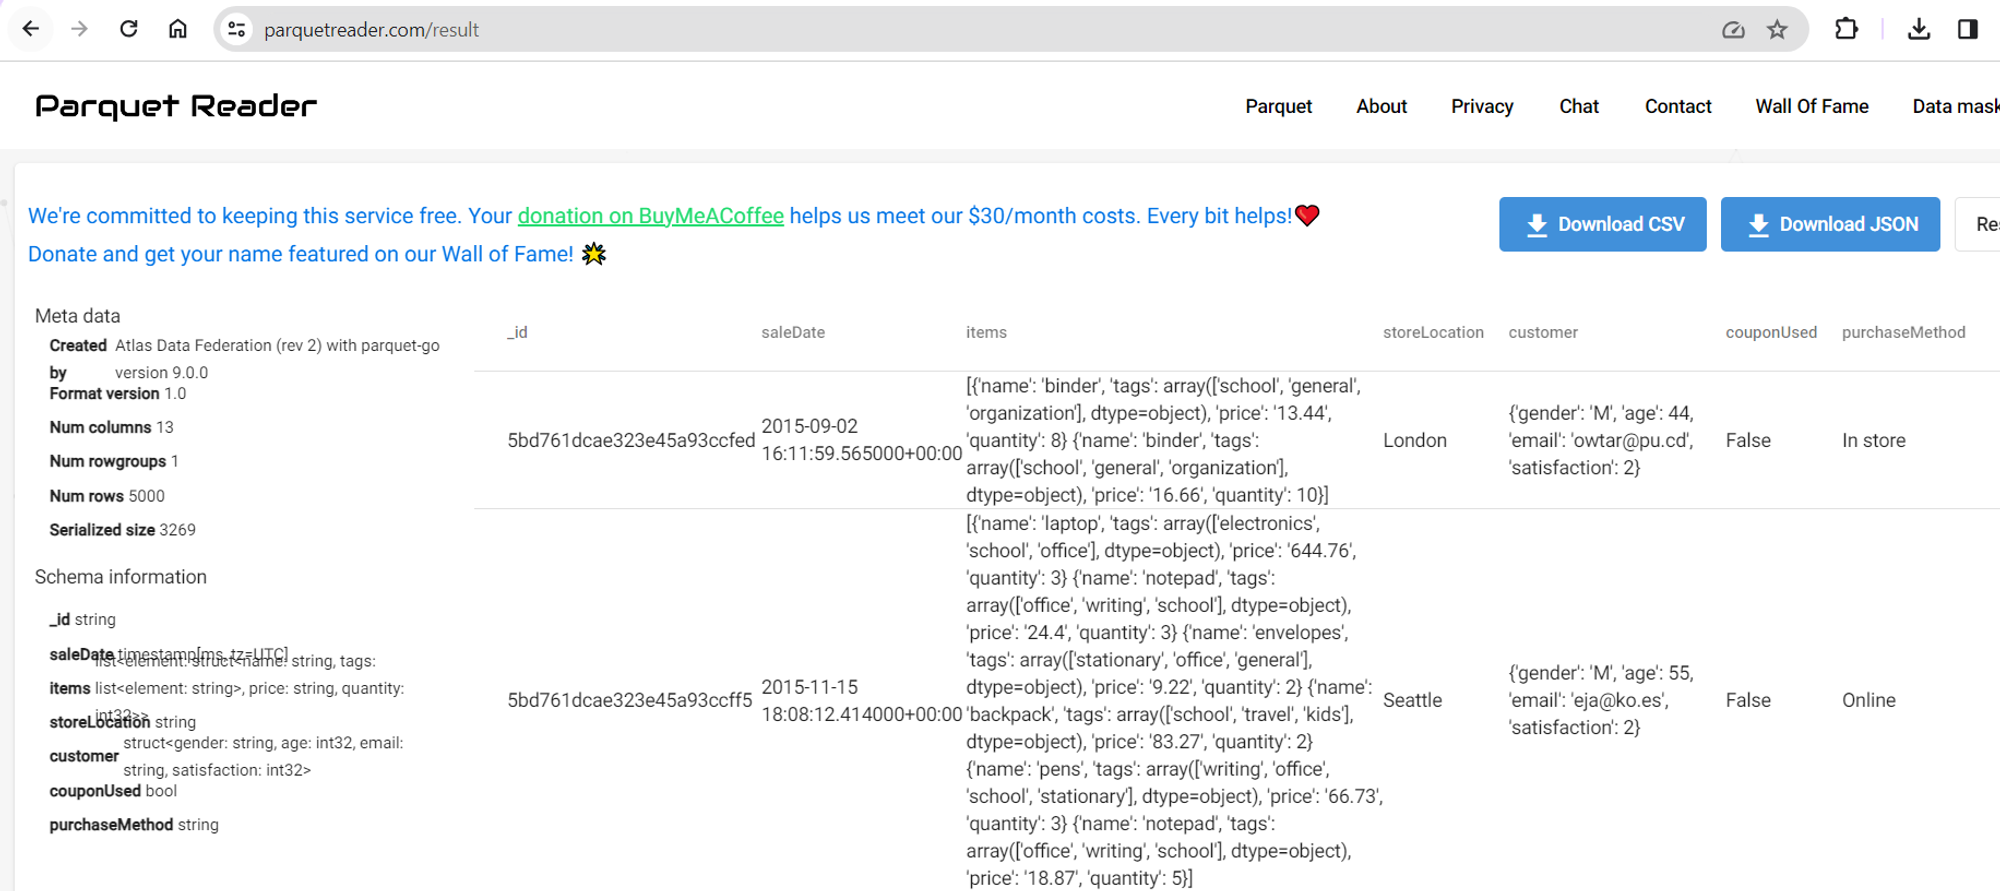
Viewing the Parquet File Using an Online Parquet Reader
Open https://parquetreader.com/ in your browser to upload the Parquet file online. Once the file is uploaded, you'll see an output similar to the one shown below:

Setting Up Incremental Data Load from MongoDB to S3 in Parquet
Next, switch your view to the Atlas UI screen in your browser. Navigate to the Triggers page via the side menu:
.png)
This trigger was created as part of the federated database setup process. It was done automatically for you based on the steps you completed when selecting your MongoDB database as a source, setting your S3 bucket as a destination, and configuring the scheduler process. Click the name of the trigger to view its definition:
.png)
Scroll down to view the trigger function:
.png)
The whole definition of the trigger is automatically created for you and includes the logic to move data from the MongoDB collection to the chosen S3 bucket, <span class="code-exp">demo-data-from-mongodb-to-s3</span>, in an incremental manner.
Although the trigger is in an enabled state, since you don't have any new documents inserted into the <span class="code-exp">sales</span> collection, you won't see any data in <span class="code-exp">demo-data-from-mongodb-to-s3</span>. So, to check if the incremental load is working through the trigger function, insert the following document into the <span class="code-exp">sales</span> collection using the <span class="code-exp">mongosh</span> session, which you opened earlier by connecting to the Atlas MongoDB cluster:
On successful execution of the above command, you should see the following output:
Open a terminal and execute the following AWS CLI command to verify if the incremental trigger function has moved the inserted document from the MongoDB collection to the S3 bucket:
You should see an output with a Parquet file created in the S3 bucket:
As an exercise, try out the <span class="code-exp">aws s3 cp</span> AWS CLI command from earlier and the online Parquet viewer site to verify the contents of the uploaded Parquet file.
Conclusion
You've now completed the tutorial and learned how to move data from MongoDB to Amazon S3 in Parquet format. As part of this tutorial, you set up the necessary environments, created an AWS IAM role and an S3 bucket access policy, connected the MongoDB data federation instance with a MongoDB database and Amazon S3 buckets, moved the data once, and set up a continuous pipeline for future data. By now, you should have a clear understanding of how to implement this pipeline for your own customer-facing analytics use cases.
When it comes to dealing with projects or products involving customer-facing analytics, Propel comes in handy. Propel's Serverless Analytics API platform helps you build high-performance analytics into web and mobile apps with data from your data warehouse, webhooks, streaming service, or transactional database. Propel provides and maintains the serverless ClickHouse infrastructure, allowing dev teams to focus on product experiences like usage reports, insights dashboards, or analytics APIs.
Next steps
To learn how to use S3 in customer-facing analytics in your app, check out our next blog post about Building blazing-fast data-serving APIs powered by S3 data lakes.


